Adding your own payments and deductions
Article ID
11626
Article Name
Adding your own payments and deductions
Created Date
1st January 2019
Problem
Adding your own payments and deductions
For instructions specific to different types of attachment of earnings orders (ie. Council Tax Attachments, Direct Earnings Attachment, Earnings Arrestment Orders, etc.) please read this KB: click here.
Resolution
Go to “Company” > “Alter Payments & Deductions”
This will open the company payments and deductions list:
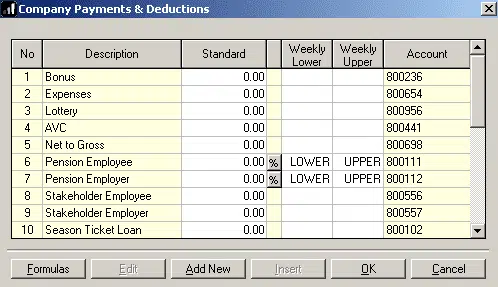
Click the button “Add New”. You will be asked if you want to use the setup wizard.
The setup wizard will guide you through the process of creating a payment or deduction to suit your requirements as you work through a series of on-screen questions.
If you are new to the system we recommend you use the wizard for the first few payments/deductions you configure.
We will not go into details of the wizard here as it is easy to follow the on-screen instructions you will see.
If you click “No” on the wizard message you can set up the payments/deductions directly. You will see this screen:
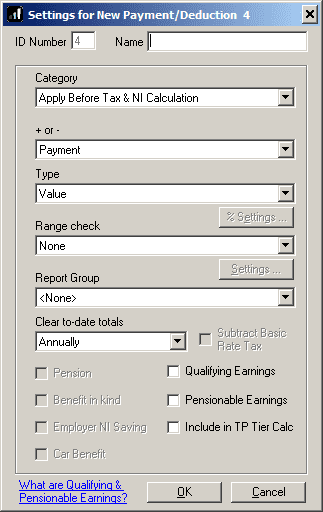
Here we configure how the payments/deductions will behave.
Name: Type a description in here. This is how the payments/deductions will show on reports and payslips.
Category: Select an option from the list.
Attachment of Earnings: The list contains options for attachment of earning orders (AEO) eg. Council Tax (England & Wales) Post April ’07. If you are setting up an AEO choose the appropriate option from the list. Once you choose an AEO option you will see the other options on this screen get “greyed” out. These are all set to the standard configuration for that type of attachment. In this case, you are finished, just click “OK”.
For more detailed instructions specific to attachment of earnings orders please read this KB: click here.
Other Category Options:
Apply Before Tax & NI Calculation: This option will process the payment or deduction directly to gross pay for the employee.
Apply After Tax & NI Calculation: This option will process the payment or deduction to the net pay for the employee.
Apply After Tax Calc but Before NI Calc: Using this option, the payment or deduction will affect the NI calculation but leave the tax calculation unaffected.
Apply After NI Calc but Before Tax Calc: Using this option, the payment or deduction will affect the tax calculation but not the NI calculation.
Net to Gross: Using this option you type the net amount you wish the employee receive and the system back calculates the gross value required to cover the tax/NI calc to leave the employee with desired net payment.
Display item only: This option will process a value against an employee but this will not affect their pay. This is used for items like employers pension contributions. There is also an option “Display item – Hidden from payslips” this is the same but will not show up on the employee payslips.
+ or -: Choose here if this is a payment or a deduction.
Type: Choose an option here to set how the payments/deductions will get the value to process.
Common Options: There are lots of options in this list, we’ll just touch on the commonly used ones. For further assistance on the other options search the help files available from “Help” > “EARNIE Help” / “IRIS Payroll Professional Help”.
Value: The most basic option, you need to type in a £ value against the payments/deductions.
Percentage: Using this option the system will calculate a percentage of other pay elements. Once you have selected “Percentage” as the option you will need to click the “% Settings” button to set which pay elements contribute to the percentage calculation.
Percentage Auto Enrolment: Similar to the regular percentage option but designed for auto-enrolment pensions. Using this option the system will pool together all the pensionable pay elements, knock off any earnings above the UEL and below the LEL and calculate the percentage on the remaining pay. When using this option pensionable pay items are configured in “Pension” > “Configure Earnings”.
Formula: No matter how flexible we try to make the program there will always be an eventuality we have not foreseen. This option lets you invent and create your own ways of determining how a payment/deduction should be configured.
Basic Formula Example: Your company has a banded pension scheme. Employees pay either 5% or 8% of their salary into the scheme.
The formula for the payment/deduction could be:
IF Payment Deduction Standard {Current} = 1 THEN MEMORY1 = 0.05
IF Payment Deduction Standard {Current} = 2 THEN MEMORY1 = 0.08
MEMORY3 = Salary This Period * Memory1
RESULT = Memory3
Putting either ’1’ or ’2’ in the employee’s data would then make the payment/deduction 5% or 8% of this month’s salary.
Formulas are a powerful tool in the software and can be configured to cover a wide range of situations. For more details information about using formulas for programmable payments & deductions go to “Help” > “EARNIE Help” / “IRIS Payroll Professional Help” > “Chapter 5 – Programmable Payments & Deductions”
Range Check: The program allows you to set upper and lower limits so that a payment/deduction can reference them before being applied.
Report Group: A Report Group is a group of payments/deductions that are collated together to make it easy to report on them. It holds the sum total of all the figures of the member payments/deductions.
There are a number of pre-configured report groups in the program. When you first start they are all empty. You can add your payments/deductions to these groups as you develop the system.
Report groups can also be used with the quick report writer.
Clear to-date totals: All payments/deductions are totalled throughout the year but they can be cleared down at intervals if required for reporting purposes.
This option sets the frequency the payment/deduction cleared down; that is, reset to zero:
Annually option is most commonly used. This clears down the payment/deduction at the end of the Tax Year; as part of March’s month-end process.
When Total is Zero is a special setting, used for reducing balances. When this is set, a deduction is only taken if there is an amount outstanding in the To-Date column on the Pay/Deds tab card of the employee’s details.
Tick Box Options: Finally there some tick box options to configure. NOTE: Not all of these options are available on all types of payment/deduction.
Subtract Basic Rate Tax: Tick this box if the deduction is to be exempt from Income Tax at the Basic Rate.
Pension: Tick this box if this is a pension contribution. This will make the pay element show on the RTI submission as a pension and make it available to assign to a pension fund.
Benefit in Kind: Is this being used to work out the tax/NI on a benefit in kind ie. private medical cover.
Qualifying Earnings / Pensionable Earnings: This sets if this payment would contribute to Qualifying and/or pensionable earnings for auto-enrolment purposes.
Employer NI Saving This option is only available if the category is set to “Display Item Only” and the type is set to “Percentage“. You would use this display item to include all or part of the employer NI saving in the pension contributions when processing a salary sacrifice pension scheme.
Include in TP Tier Calc: Tick this option if you want payments made on this code to contribute to the % tier selection used for Teachers Pension contributions.
Car Benefit: Not used from this screen, for full details on processing car benefit in payroll please refer to the guidance here: https://www.iris.co.uk/support/car-and-fuel-benefits/
We are sorry you did not find this KB article helpful. Please use the box below to let us know how we can improve it.