Configuring the Accounts Link & Producing the Journal File
Article ID
11959
Article Name
Configuring the Accounts Link & Producing the Journal File
Created Date
30th October 2019
Problem
How do I configure the accounts link so I can post a journal file?
Resolution
Configuring the Accounts Link
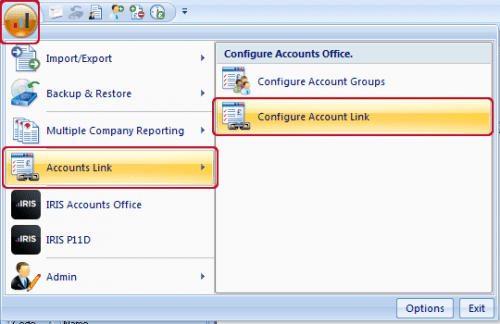
To open the Configure Accounts Link screen, go to the Application menu, select Accounts Link then Configure Account Link:
Use the Configure Accounts Link screen to create a chart of accounts for your company and to create a link between IRIS Payroll and IRIS Accounts Office (or one of the other packages available).
IRIS Accounts Office
If you are using this software you do not need to type in your nominal codes as described below, you can select them from the list of codes configured in IRIS Accounts Office.
Headings Tab
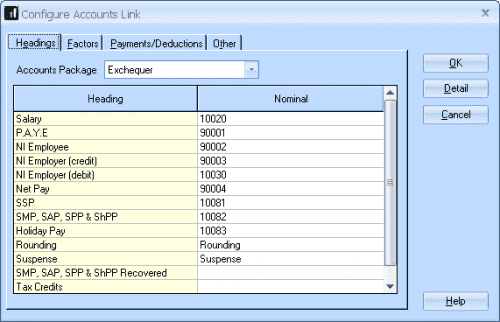
Accounts Package
Select the accounts software you want to post too. Changing the Accounts Package can cause some of your data (typed in nominals) to be lost, so only change this option WITH CAUTION.
Heading
Each pay element listed in the Heading column can be assigned a separate Nominal code. You cannot add to the list in the Heading column.
There are special cases:
•SMP, SAP, SPP & ShPP Recovered – if you do not make an entry here, the IRIS Payroll will not include any statutory payments recovered in the journal file, the recovered amount is deducted from the SMP, SAP, SPP & ShPP figure.
• Tax Credits – after 6 April 2006 Tax Credits were no longer paid through the payroll but the heading still appears for historical purposes.
• Student Loans – if you do not make an entry here the amount will be included in the PAYE account.
Nominal
To assign a Nominal code, click in the Nominal column.
You can use asterisks (the * character) to make up part of the Nominal code. At processing time they will be replaced by characters from the Account Group. To use this feature you must click on the Other tab and enter Y in the Account Group Breakdown field.
Example: If your Account Groups are WIGAN and MANCHESTER, and you enter ***SALARY as the Nominal for the Salary pay element, when you create the journal file it will contain the codes WIGSALARY and MANSALARY.
Note: Nominal codes are also known as General Ledger codes.
Factors Tab

Use the Factors tab to assign Nominal codes to Overtime Factors.
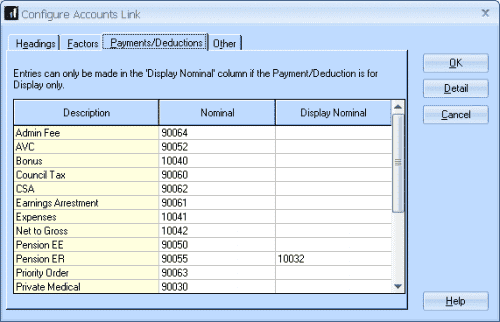
Payments/Deductions Tab
Use the Payments/Deductions tab to assign Nominal codes to Payments, Deductions, Pensions and Attachments of Earnings.
Display Nominal
Some items are processed through the payroll but do not affect the employee’s pay, such as employer’s pension. To include these in the accounts link you need a balancing entry. Enter the Nominal code for the balancing entry in the Display Nominal column.
You only need to enter a Display Nominal for employer’s pensions and for Payment/Deductions of type Display Item.
Other Tab

The fields included in this tab depend on the accounts package you selected on the Headings tab.
Account Group Breakdown
Enter “Y” if you want to include Account Group names to replace asterisks (the * character) used as part of the Nominal codes. See the Nominal section above for an example.
Detail
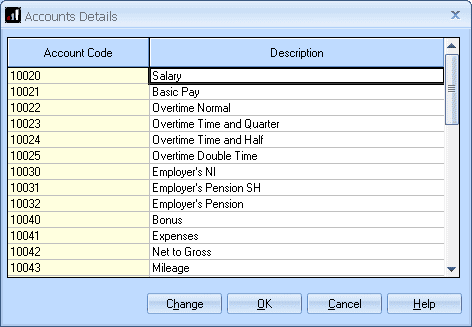
Click on “Detail” to open the Accounts Details window which allows you to assign a description to each Nominal. These descriptions are for reporting only, they do not appear in the journal file.
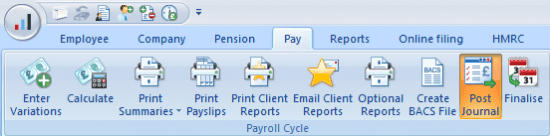
Posting the Journal File
To open the Create Accounts Link screen to post a journal file, click on the Pay tab then click Post Journal.
You will then be presented with the Post Journal options:
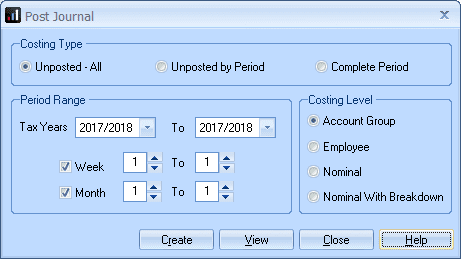
Use this screen to create a file of accounts information that can be imported into your accounts package. You can also preview the accounts information that is included in the file.
Costing Type
The option you choose here determines which information is included in the accounts file:
• Unposted All – the file will include all accounts information that has not yet been included in a previous accounts file (i.e. all new accounts information)
• Unposted by Period – the file will include all accounts information from the specified Pay Period(s) that has not yet been included in a previous accounts file
• Complete Period – the file will include all accounts information from the specified Pay Period(s) regardless of whether the information has already been included in a previous accounts file
Using either of the Unposted options ensures that the accounts file does not include any information that has already been imported into your accounts package, which means there will be no duplicated entries.
The Complete Period option is useful if you know that no data has yet been imported into your accounts package for the Pay Period(s) concerned.
Period Range
If you choose Unposted All as the Costing Type, the Period Range fields are disabled. Otherwise, you can specify which pay period(s) information you wish to post.
Tax Years
If you have been using IRIS Payroll for several years, you can select previous tax years to include in the accounts file. This might be useful, for example, if you have lost your accounts data and you need to reconstruct it.
Week & Month
If you are running a payroll which includes both weekly-paid and monthly-paid employees, you can include both weekly and monthly information in the accounts file. If you want to create a file that contains only weekly information, for example, you should un-tick the Month box.
You can select a range of weeks (or months) by entering the start and end periods in the boxes provided, or you can specify a single week (or month) by entering the same pay period in both boxes.
Costing Level
The Costing Level has no effect on the information in the accounts file; it is only used in the View Journal screen which is displayed if you click View, see below for more details on the View Journal options.
Create
Click the Create button to display the Enter Account Details screen which allows you to create the file of accounts information:
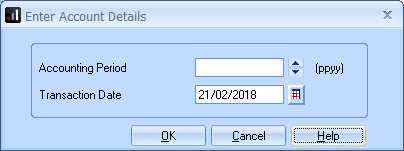
Some accounting packages require additional information to be included in the Journal File so they can import it successfully.
Use the Enter Account Details screen to specify additional information for the Journal File.
Accounting Period
Enter the Accounting Period as specified by your accounts package.
Transaction Period
The default Transaction Date is the current date but you can amend this if you prefer.
When you click OK the journal file is created, ready to import into your accounts package. The process of importing the data into your accounts package will vary from product to product. If you are unsure how to achieve this please contact your accounts software provider for assistance.
The journal file itself will be created in your payroll installation folder, if you are unsure where this is, check the Program location from Help | About IRIS Bureau Payroll or Help | About IRIS Payroll Business, depending on your product.
View
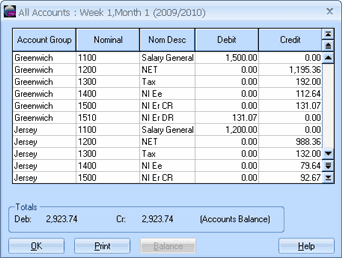
Click the View button to display the View Journal screen. This does not create the file, it just allows you to see what information would be included in the file if you were to create it.
View Journal Details
The details shown in the View Journal screen depend on the Costing Level you select in the Create Accounts Link screen:
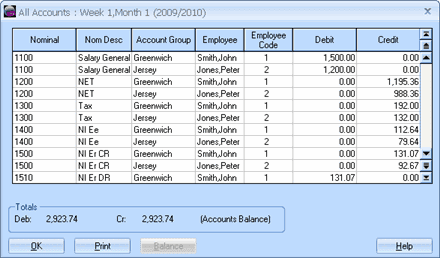
Costing Level: Account Group:
Costing Level: Employee:
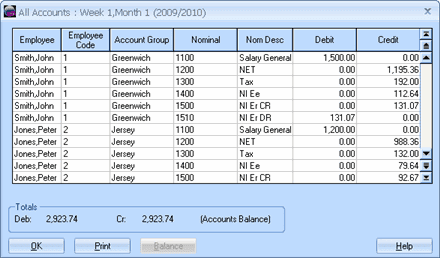
Costing Level: Nominal:
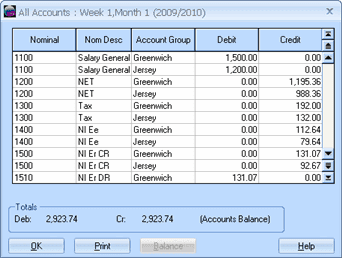
Costing Level: Nominal with Breakdown:
Balance
The Balance button is normally disabled (greyed out). It is only enabled if your journal does not balance for some reason. If this is the case, you can force the imbalance to be posted to your suspense account by clicking Balance.
We are sorry you did not find this KB article helpful. Please use the box below to let us know how we can improve it.