Using a Time and Attendance System
Article ID
11674
Article Name
Using a Time and Attendance System
Created Date
16th March 2015
Problem
Can I link my payroll to my time and attendance system?
Please Note: These details cover the following payroll products:
• IRIS Payroll Business
• IRIS Bureau Payroll
• IRIS Payroll Professional
• Earnie
Resolution
If the time and attendance system can be configured to output the details in the correct format you can use this to automatically populate pay variations in payroll.
Refer your T & A system provider to this information so they can configure the correct output
Clockin
CLOCKIN files are ones that enable you to import information into payroll that has been generated either from a time and attendance or clock-in system, or from a database. This information does not come in through the Import Data option: its presence is detected automatically by payroll when you click Enter Variations.
Clock-in Files
Time and Attendance or clock-in details must be stored in a Clock-in file (CLOCKIN.xxx where xxx is the company number) The Clock-in file needs to be saved in the same folder as the program files (For example C:\IRIS Payroll Business). If a Clock-in file is present when you go into Enter Variations, the program will read the information for each employee.
Clock-in File Layout
There are three formats for Clock-in file:
Fixed Length
CSV
Database
Fixed Length
A Fixed Length Clock-in file needs to be created using the following specification:
NNNNNNNNNNXX99999999 where:
NNNNNNNNNN is the Employee Code
XX is the Payment Type Identifier (for example rate, bonus, salary)
99999999 is the Amount (amounts are in pence, hours x 100 or rate number x 100)
The identifier and amount can be repeated up to 20 times on the same record and an employee can have up to 50 records.
The file should be in employee code order.
Payment Type Identifier
01 to 12 this is the identifier for hours at factors 1 to 12
21 to 32 this is the hourly rate identifier for the above hours. If you do not issue an identifier it will default to rate 1.
41 to 80 this identifies Payments or Deductions 1 to 40
91 Salary
92 SSP
93 SMP
95 Holiday Taken
96 Advance Number of Holiday Periods
97 SAP
98 SPP
Amount
For identifiers from 1 to 12 the amount is in hundredths of hours. For identifiers from 21 to 32, the amounts are 100, 200, 300, 400 or 500 for the first 5 hourly rates of pay. All remaining amounts are in pence. If a negative value is required, the first character of the amount should be a – (minus sign).
Example
To pay employee 47 16 hours at rate number 3, together with 4 hours at the same rate but at time and a half (factor 2), in fixed length this would be displayed as follows: Fixed Length Breakdown based on above example
00000000470100001600 (0000000047 – employee code, 01 – Factor ID, 00001600 – Number of hours)
00000000472100000300 (0000000047 – employee code, 21 – Links factor to rate, 00000300 – Rate ID)
00000000470200000400 (0000000047 – employee code, 02 – Factor ID, 00000400 – Number of hours)
00000000472200000300 (0000000047 – employee code, 22 – Links factor to rate, 00000300 – Rate ID)
Note
In Fixed Length format you cannot access payment/deductions beyond No 40.
CSV Files
You can also create the clock-in file in comma-separated format. It requires the same field sequence as Fixed Length, except a comma separates the field and there is no requirement for fixed lengths or zero/space padding. The values are as above (pence for amounts and hours times 100 for hours.)
If the amount / hours field has a decimal point there must be two digits after it as the point is ignored when converting the field to a number. For example 17.1 would be read as £1.71 whereas 17.10 would be read as £17.10.
The employee code can be enclosed in quotes if required. Payroll Business will only accept values for payment and deduction numbers 0001 to 0040 using the normal file layout. However if the CSV version is used, identifiers 10001 to 10099 can be used for payment / deductions 1 to 99.
After import, the clock-in file must either be overwritten or deleted.
Example
To pay employee 47 16 hours at rate number 3, together with 4 hours at the same rate but at time and a half (factor 2), in fixed length this would be displayed as follows:
47,01,1600 (47 – employee code, 01 – Factor ID, 1600 – Number of hours)
47,21,300 (47 – employee code, 21 – Links factor to rate, 300 – Rate ID)
47,02,400 (47 – employee code, 02 – Factor ID, 400 – Number of hours)
47,22,300 (47 – employee code, 22 – Links factor to rate, 300 – Rate ID)
Clockin.MDB
To import data from a database, there must be a file called CLOCKIN.mdb present in the program folder.
When you click Enter Variations, payroll, before looking for a text-based time & attendance file, checks first for the presence of CLOCKIN.mdb and that there are entries for the company.
Layout of CLOCKIN.MDB
The ID and Value fields of the database are the same as the text based fields, except:
- The Value should be in pounds and pence
- Rates should not be multiplied by 100
The database version works in exactly the same way as the other Clock-in files, except the source data is now period specific.
The period has to be in the program’s standard form:
yyyyPnn where: yyyy is the year P=1 for Monthly or =0 for (multi) Weekly nn is the Period number
For Example Week 47 of tax year 2012/13 would be 2012047 and month 3 of 2012/13 would be 2012103.
Comparison between Fixed length / CSV
This is a simple example of the format for a file that imports the following data:
Employee No 1 has worked 20 hours at pay rate No 4 and Overtime factor No 1.
Employee No 1 has worked 8 hours at pay rate No 2 and Overtime factor No 2.
Employee No 1 has received a £50.00 for payment (Bonus) No 1.
Employee No 2 has worked 32 hours at pay rate No 3 and Overtime factor No 1.
Employee No 2 has received SSP at £81.60.
Employee No 3 has worked 35 hours at pay rate No 3 and Overtime factor No 1.
Employee No 3 has received a £25.00 for payment (Expenses) No 2.
| Fixed Length Format | CSV Format |
| 10100002000 | 1,01,2000 |
| 12100000400 | 1,21,400 |
| 10200000800 | 1,02,800 |
| 12200000200 | 1,22,200 |
| 14100005000 | 1,41,5000 |
| 20100003200 | 2,01,3200 |
| 22100000300 | 2,21,300 |
| 29200008160 | 2,92,8160 |
| 30100003500 | 3,01,3500 |
| 32100000300 | 3,21,300 |
| 34200002500 | 3,42,2500 |
NOTE:
In Fixed Length format you cannot access payment/deductions beyond No 40. This limitation is overcome in CSV by having the format as:
10000 + the payment or deduction number. For example payment number 55 would become 10055
Creating a CSV File from a Spreadsheet
To create a CSV for CLOCKIN from a spreadsheet, open a blank workbook in Excel. There are only 3 columns needed which contain the employee code, the identifier and the amount.
Column A – In column A, record the employee code for the individual
Column B – In column B, record the identifier i.e. the factor ID if using pay rates; the payment ID if making a payment. For instance, for SSP use the identifier of 92.
Note: If using CLOCKIN for entering pay rates information, a pay rate needs to be set up in the Employee Details, Pay Elements tab with an amount in the £/hour column.
Column C – Enter in column C the amount, for example:
5000 (this would be £50.00) – this would link to payments or deductions
the number of hours being paid – 2000 (20 hours)
the rate ID x 100 – 400 (Rate 4)
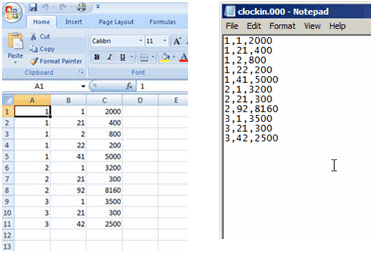
The images below show how this simple example would show in a CSV file:
Employee No 1 has worked 20 hours at pay rate No 4 and Overtime factor No 1.
Employee No 1 has worked 8 hours at pay rate No 2 and Overtime factor No 2.
Employee No 1 has received a £50.00 for payment (Bonus) No 1.
Employee No 2 has worked 32 hours at pay rate No 3 and Overtime factor No 1.
Employee No 2 has received SSP at £81.60.
Employee No 3 has worked 35 hours at pay rate No 3 and Overtime factor No 1.
Employee No 3 has received a £25.00 for payment (Expenses) No 2
Using the above data this is an example of a spreadsheet that could be used for CLOCKIN.
Column A shows the Employee Code
Column B shows the payment Identifier
Column C shows the amount
The spreadsheet has been saved as Clockin.csv. Once saved as Clockin.csv, you will need to rename the Clockin.csv to clockin.xxx (where xxx is the Company No). In this instance the extension is 000 as we are using the Demonstration Company.
(See above for how this file looks in Notepad)
A breakdown of the first 2 lines is as follows:
Line 1
1 = employee code
1 = Factor ID
2000 = 20 hours
Line 2
1 = employee code
21 = this identifier links the rate that follows to the factor in line 1. Identifiers are used to link the rate number with the number of hours at a given factor. In this example the 2 is the identifier and the factor is 1 resulting in 21.
400 = this is the Rate id which in this case is 4.
Once the information has been entered into the spreadsheet (as per the screenshot earlier in this topic), click on the File menu then choose Save As and save the document as a CSV file with the name CLOCKIN. Save this document into a convenient location. Once saved, locate the file CLOCKIN.csv and right click and rename. Rename the file to CLOCKIN.000 (in this guide we are using the Demonstration Company which is ID 000, if you were in Company 1 you would rename the file to CLOCKIN.001). Then right click on the CLOCKIN.000 file and click copy. Once copied the CLOCKIN.000 file needs to be pasted into the payroll folder. You can check the location of your installation by clicking on the Help tab and About….. .
Once the CLOCKIN file is in the payroll directory, the next time you Enter Variations for the next payroll it will read the clock-in information. Using the example detailed earlier in this document the next screenshot displays the hours and payment entered for employee 1.
We are sorry you did not find this KB article helpful. Please use the box below to let us know how we can improve it.