Importing/Exporting Data from payroll
Article ID
11810
Article Name
Importing/Exporting Data from payroll
Created Date
19th November 2019
Problem
Working with import/export structures in Earnie.
Before proceeding, please be aware, this process is designed for importing static data into payroll, for example importing employee email addresses or even creating employee records. This method is not suitable for importing pay period variations as all imported pay values are set as standard amounts (repeating each period) rather than temporary ones.
If you are looking to import pay variations we recommend you look at the spreadsheet import module, job card import as a part of the costing module or linking payroll to a time & attendance system using a clockin file.
Resolution
Imports and exports are guided by the structure file. This is essentially a list that tells payroll what each piece of information is and where to place it in the employee details. Before you can work with imports/exports you will need to create a structure file.
Please Note: This guide focuses on the process of importing data. Exporting data works in exactly the same fashion except is accessed from “File” > “Export Data“. Whenever you save an import structure the corresponding export structure is automatically created and vice versa.
Go to “File” > “Import Data” (to set up an export structure “File” > “Export Data“)
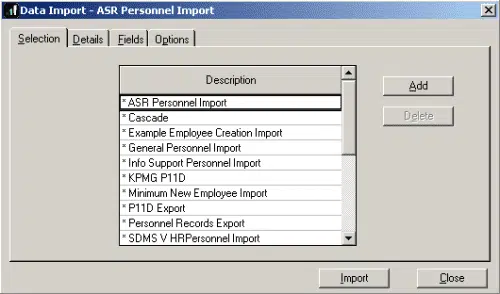
This window is where you see what structures are already in place and where you can change them or add new ones of your own making. Structures whose descriptions start with * are dedicated to the system, you can look at them but not change them.
To create a new structure click “Add”. The message prompt will ask if you wish to copy the current structure highlighted.
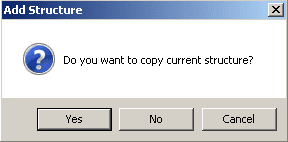
To keep things simple for now, click “No” so we start with an empty structure.
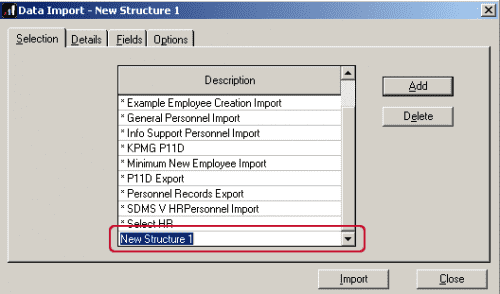
You will see “New Structure (n)” added to the bottom of the list:
Give this structure a name that will help you identify its purpose when returning to this list.
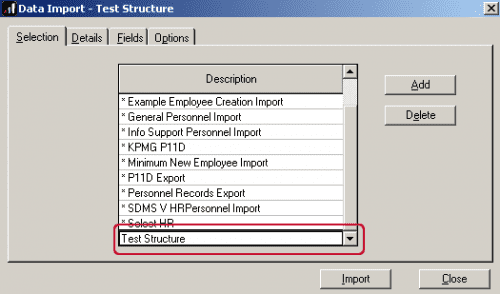
That’s the structure created, next click on the “Details” tab.
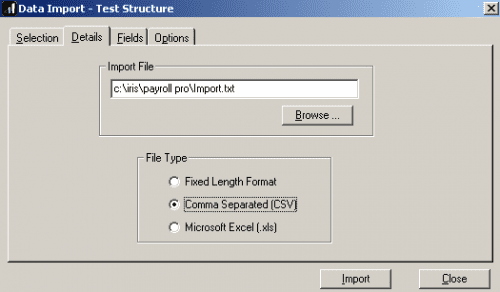
Import File: This is the location of the file containing the details you want to import. You can click the “Browse” button to search the system. Double-click on the file name when you find it.
File Type: There are a few options here. “Comma Separated (CSV)” is by far the easiest to work with and will be the option this tutorial focuses on. With a CSV file fields can be of varying length but must be separated from each other by a comma. Your source file would look something like this:
1001,Mr,Bob,Belcher,AB123456A,01/01/1979,
Further details on fixed length and excel types can be found in the software help files.
Next, click on the “Fields” tab.
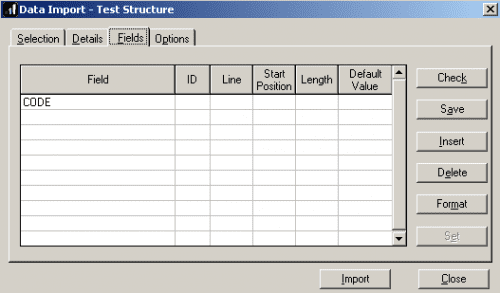
Because we are using the type “comma separated” we can ignore the columns “Line”, “Start Position”, “Length” and “Default Value”
The object here then is to build up a list of the details contained in your source file. These need to be added in the same order they appear in the source file. You will always need to start with CODE. This is the employee number in payroll and is used to identify which record we are updating/creating. If we use the example from above:
1001,Mr,Bob,Belcher,AB123456A,01/01/1979,
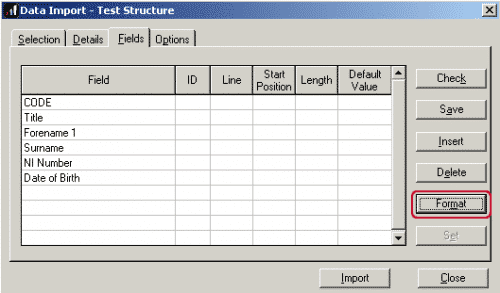
Working down the list from CODE, we would add; “Title”, “Forename 1”, “Surname”, “NI Number” and “Date of Birth”. Your import structure will end up looking like this:
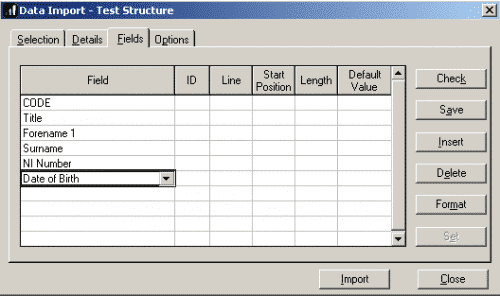
Using this structure we could import the example CSV to either update the details of employee no. 1001 or create employee 1001 with these details (if 1001 doesn’t already exist).
ID Column
Some options in payroll allow for more than one entry per employee. For example, you can have multiple bank accounts saved per employee. The ID number selects which option to save these details under:
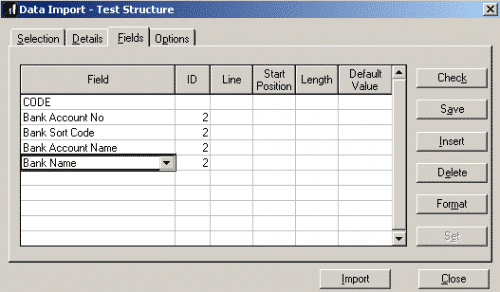
In the above example, any details imported would be saved under the employees’ second bank account in their record card.
If importing hourly rates, standard hours and standard values for payments/deductions the ID column will tell the system which rate/payment/deduction these values belong to:
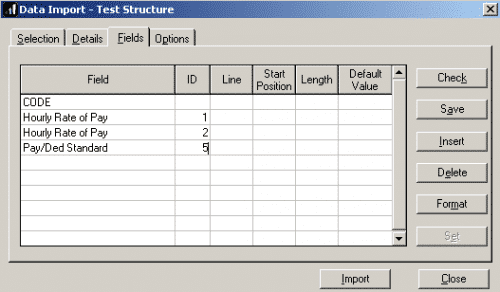
In the above example, the details imported will be set as the rate per hour for rates 1 and 2 along with a standard value for pay/ded number 5.
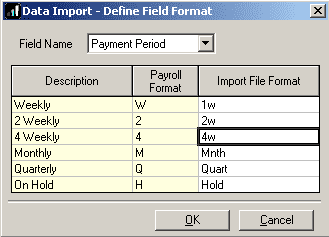
Notes about “Format” options.
This allows you to equate what is coming in from the file to what the program really needs.
The column “Payroll Format” is what the program is expecting to see in the source file. You can change the value in “Import File Format” if the source file is generated with different information.
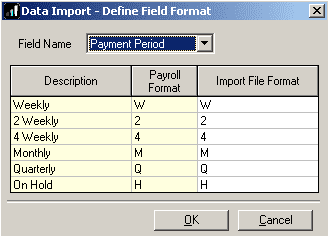
For example, 4-weekly paid people need ’4’ as their payment period whereas the file data may be ’4w’. Here you tell the program to change all ’4w’s into ’4’s.
Once you have built up your list of details to match the source file click “Save”.
NOTE: Whenever you save an import structure the system will automatically make the same structure available in the “Export Data” list.
Click on the “Options” tab.
Here we set some rules for how payroll is going to work through the import file:
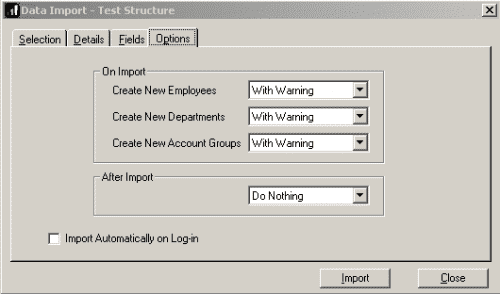
On Import:
If you import data that is telling the program to create a New employee because the CODE in the file does not exist, what do you want it to do?
Without Warning – Just go ahead and do it
With Warning – Will pause the import and give you a chance to select yes or no
The same options apply to new departments and new account groups.
After Import:
You can Rename the File so there is no chance of the same data being imported again by mistake
You can Delete the File so there is never any chance of the data being imported again, full stop
You can Do Nothing.
Import Automatically on Log – in:
Tick this box if you wish the program to pick up the data automatically, say from a personnel system whenever you log in.
That is the import structure set up and ready to use.
To perform an import you can click on the “Import” button and the system will import the details contained in the file referenced in “Details” tab.
Export Error: Invalid file
If, when you are exporting data, you get the error:
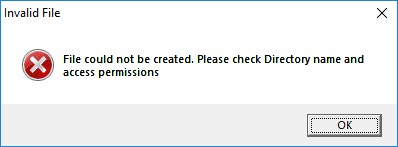
This error occurs when the file you are trying to export is already open in another application, Microsoft Excel for example. The payroll software cannot re-export the file if it is open in another application.
Make sure all users have closed the file and export the data again.
We are sorry you did not find this KB article helpful. Please use the box below to let us know how we can improve it.