Importing Data from Bookkeeping Packages into Accounts Production
Article ID
kas-0023
Article Name
Importing Data from Bookkeeping Packages into Accounts Production
Created Date
9th January 2021
Problem
Importing data into IRIS Keytime Accounts Production
Resolution
Accounts Production can import data from several bookkeeping and other Accounts Production packages. Currently these are:
- Kashflow
- Xero
- PTP/IRIS Accounts Production
- CSV
To import a trial balance from Kashflow or Xero, proceed as follows:
- Click Options / Import Credentials / IRIS KashFlow Details or Xero Details, enter your KashFlow Connect/Xero agent email address and password
- Click Maintain on the main toolbar, in the Client tab click the Import button
- In step 1 select KashFlow/Xero as the data source, step 2 auto-populates with your KashFlow Connect or Xero agent email address and password. Enter the KashFlow Username for this set of accounts (this is the username of the company you want to link to)
- Step 4 allows you to review account mappings between KashFlow/Xero and Accounts Production. The accounts are ready mapped to the KashFlow/Xero standard ledger code list, note that the mapping may need editing if account codes have been changed or edited in KashFlow or Xero (see below)
- In step 5 click the Import button to proceed with the import of data from the trail balance. You will be presented with the accounting period to import and an option to include opening balances. The Xero import will prompt you to open a session, which runs for 30 mins. Including opening balances will import the cumulative position rather than the movement on the individual accounts
- Close the Maintain screen and open Journal Entries in the navigation pane; the imported journal will be visible and you can un-post and make changes if you wish before re-posting
- Once the link between the set of accounts and the KashFlow client has been setup, you can click Import on the main toolbar to import data where you will only be prompted for the accounting period
Keytime Accounts Production also offers the flexibility to import data from CSV files; Excel can output files in CSV format. Imports from PTP and IRIS Accounts Production are done in CSV format, the only difference for this type of import is that we have included a pre-mapped template to link to csv files output from these products – select PTP or IRIS rather than csv when selecting the data source, an appropriate template will appear in the Template field for you to use.
To import data from a trial balance in CSV format it may be necessary to review the format of the trial balance as Accounts Production requires the data to be in a specific order before it can be imported. Proceed as follows:
Review your trial balance in Excel (or similar), the file must be in the following layout:
| Column A | Date |
| Column B | Ledger Code |
| Column c | Account description |
| Column D | Debit balance (as positive amounts) |
| Column E | Credit balance (as positive amounts) |
Below is a sample screen shot from a trial balance in the correct format in Excel:
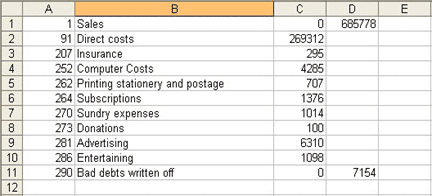
There must be no header or footer (debit and credit columns must not be totalled, although it is a good idea to ensure that the columns agree prior to import)
There must be no speech marks ( “ ‘ ) or commas ( , ) anywhere in the file
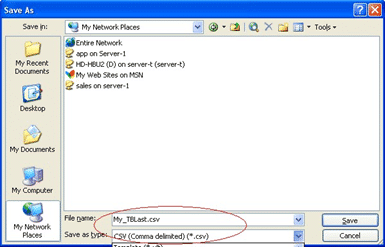
If you make a change to the file layout, please ensure it is saved in CSV format by clicking File, then Save As and selecting CSV (comma delimited) as the file type:
Once you have your CSV file created and saved in a known location, open Accounts Production and open the set of accounts you wish to import into.
- Click the Maintain button on the main toolbar, in the Clients tab click the Import button, select csv as the data source
- In step 2 click the Brose button and navigate to the location of your csv file
- To apply or review code mapping, click the Mapping button. You can apply a premapped template by clicking the dropdown in the Template Name field and selecting the name of the template (see below for details on how to amend template mapping), click Save and Close once you are done with mapping
- Click Import to import the data
Map the ledger codes proceed as follows:
- In the Import screen, click Mapping
- Map codes by selecting the code in the left of the screen and match it off with a corresponding code on the right of the screen, click Map; the mapped codes will appear in the frame at the bottom of the screen:
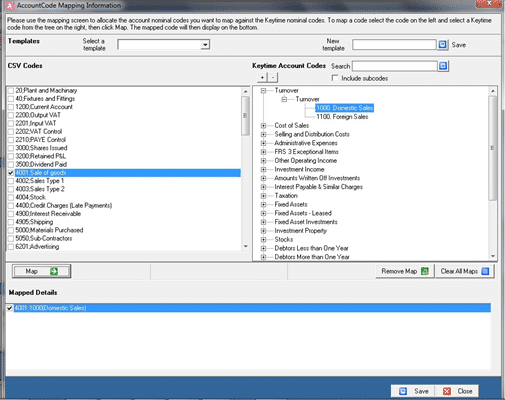
- To amend mappings, click the code you wish to amend in the bottom section of the screen and click Remove Map (bottom right), you will see that the code now appears in the top section of the screen ready for you to map to an alternative Keytime code
- Clear All Maps will remove all mappings
- To save your mapping for future use as a template, enter a template name in the new template field and click Save
- Once you are finished with mappings click Save and Close
We are sorry you did not find this KB article helpful. Please use the box below to let us know how we can improve it.